Data Entry
Starting Data Entry
To run MapMate click on the Windows 'Start' Button and select 'Programs' > 'MapMate' (it has a 'Globe' icon
 ). On your computer you may prefer to start MapMate from a 'shortcut' on the desktop or a button on a 'Toolbar' (if installed). ). On your computer you may prefer to start MapMate from a 'shortcut' on the desktop or a button on a 'Toolbar' (if installed).
The MapMate Main, or Opening, Screen appears, click the words 'Data
Entry' on the bar at the top left of the screen (or press 'Ctrl+E at the Main Screen).
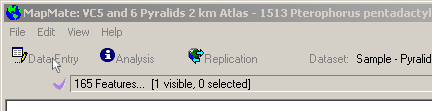
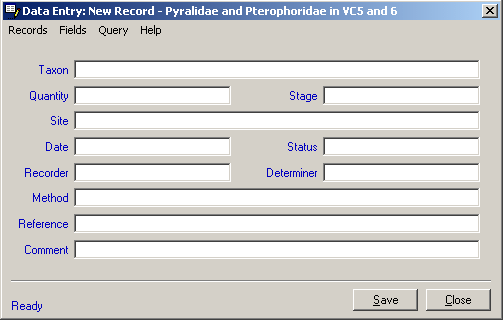
The 'Data Entry' form opens.
General Data Entry Techniques
To enter data into a field, type a part of the name and press the 'Enter' key; the program will try to match your entry with the data in the appropriate table. If there is more than one match a
Match List will be shown for you to select the correct one. Alternatively you can press the 'F2' key while the insertion point is in the field and you will be shown a list of all the options (probably not a good idea in the Taxon field unless you have limited the available range using your
Defaults). You can use the 'Esc' key to cancel a long listing generated in response to pressing 'F2'.
The 'F2' key just lists the values available for the field but does not give any details about them. To list the values with full details press 'Ctrl+B' (instead of 'F2'). This listing shows the full details of the alternatives; but when you want to insert one into the 'Data Entry' field it has to be copied to the
clipboard and pasted in.
If you press the 'F1' key while the insertion point is in a field you will be shown the Help Screen for that field.
When a value has been entered into a field, pressing the 'Enter' key causes it to be checked for validity (resolved to a value if a date or matched to values in a table for most other fields) and moves the selection to the next available field. Pressing the 'Tab' key instead of 'Enter' will also move the selection to the next available field but without checking the entry in the field, e.g. if you enter '2/7/1990' in the date field and press 'Tab' it will be left unchanged but if you press 'Enter' it will be checked, entered in to the record, and displayed as '02 Jul 1990'. The mouse can also be used to move from one field to another in a similar manner to using the 'Tab' key. When the 'Save' button on the Data Entry form is clicked (or you press 'Ctrl+S') any fields that had not been validated previously will be checked.
If a Site or Taxon cannot be located and you suspect that it may not be recognised because it is not included in your current
Defaults (Restrictions) the first place to look is at the Title-Bar of the 'Data Entry' form as this shows your current Default settings (e.g. "Lepidoptera in Somerset")
There is a message, or status, line at the bottom left edge of the Data Entry form, this displays warnings or information (such as details of the last record you entered) in blue text.
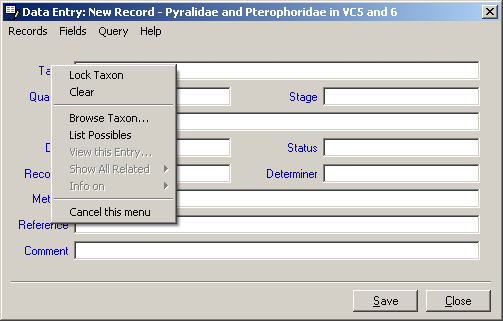
The Field Names, in blue type, to the left of the fields are themselves menu headings. If you left-click on a Menu Name a further menu will appear giving additional options appropriate, to the field or entry in the field. You can 'Lock' or 'Unlock' and 'Clear' a field (independently of other the fields), 'Browse' the available entries in the table (with full details of the entries) for that field (equivalent to pressing 'Ctrl+B' in the field) or 'List' the available entries in the table for the field (equivalent to pressing 'F2' in the field).
From the menu you can also 'View' the details of an entry that has been entered in the field (useful if you need to check further details of a Recorder, Taxa or Site to check that you have selected the correct one), 'Show All Related' (associated) fields for the entry. The option for 'Info on' will run an Analysis query to get Information related to that entry from your database; these latter options will be 'greyed-out' if the field is empty and may not be applicable to all fields. In the case of the Site, Method, Recorder and Reference fields there is an additional option to add a new entry to the appropriate table. This option is not available for fields that are predefined in the program, such as Taxon, Status or Stage,.
The Data Entry form can also be used as a Query Screen to search for records in the database.
As MapMate is a relational database you must have entered details of at least one Site, Reference and Recorder name before you can enter your first actual record.
If you have records stored in an existing database you may be able to export the data in a tab-delimited text file,
(click here for
further details).
Data Entry Fields
'Taxon' is the field into which you enter the species name. The term Taxon is used instead of Species as it can include sub-species or it could be the name for an aggregate of species that cannot be easily separated. It may be best to leave entering anything into this field until after completing and locking any fields that will be repeated in following records.
'Quantity' is the number of individuals of the Taxon, e.g. the number of individuals of a moth species in a moth trap. The Quantity is entered as '0' (zero) if the species is present but the numbers are not recorded, e.g. if on visiting a site Meadow Brown butterflies were seen but no attempt was made to make a exact count enter '0' as the Quantity. The sex can be entered by a one-letter abbreviation (e.g. 1m for one male or 2f for two females). You cannot record the Quantity of more than one sex in each record. If you need to enter quantities for both sexes separate the respective Quantities with a colon character (e.g. 2m:3f to signify two males and three females), this will generate a record for two males and another for three females with identical values in the other fields. There are also codes that can be used to enter defined
(DAFOR) Abundance values, press the 'F1' key when the cursor in the this field to be shown further details of the available values. Only records with numeric values in the
'Quantity' field can be used for quantitative analysis of abundance.
'Stage' is the stage in the lifecycle of the Taxon when it was recorded (e.g. flowering, vegetative, larva etc.). If you usually record the Adult stage type 'adu' and press return to get 'Adult' entered for the stage. If the record is not for an adult stage enter part of the name of the stage and press 'Enter'. Alternatively press the 'F2' key, when the insertion point is in the field, to be shown a list of stages and then select the appropriate one. The values in the 'Stage' table that are available to you may be altered according to your current
Defaults e.g. "flowering" or "vegetative" will be in the list if you have selected "Vascular Plants" but not if your
Defaults are set to
"Lepidoptera".
'Site' Type in the name, or part of the name, of the site or its grid reference and press 'Enter'. If the site is in the database it will be found, or a list of near matches will be shown for you to pick the correct one. If the site is not already in the database click on the word
'Site' to the left of the field and from the menu that appears select 'Add a New Site...'. Enter the details of the site in the 'Data Entry: New Site' form.
'Site' The name of the site and details of its locality (up to 64 characters).
'Gridref' The Ordinance Survey Grid Reference to the site. Preferably a 6-figure reference (MapMate can accept Grid References with up to 8 digits).
'VC' The Watsonian Vice-County name (you can enter the VC number and press 'Enter' or if you leave this field empty and press 'Enter' with the cursor in the
'VC' field and the program will offer the Vice-County(s) that correspond to the Grid Reference).
'Administrative Area' The modern Administrative area. As for 'VC' if you leave this field empty and press 'Enter' the program will offer the nearest Administrative area(s) estimated from the Grid Reference. Where the names of these areas have been changed you should presumably use the one current at the date of the record.
'Habitat' Press 'F2' for the list of available habitat descriptions or type part of the name and press 'Enter'.
'Description' A comment field where you can give a more detailed description of the site.
If you will have only a few records for a particular site it may seem rather daunting to have to complete all the above fields for just one or two records. MapMate provides a shortcut to setting up a Site record directly from the 'Data Entry' form. If in the 'Site' field you type the name and description of the site followed by the 'at' character ('@') and then the Grid Reference of the site ("sitename@Gridref" ) and press 'Enter', a new Site record will be created using these details and assigning the 'VC' and 'Administrative Area' fields from the Map Reference. Further details of this are given below under
'Shortcut entry of Site
details'.
'Date' Enter the date, using the full four digit year value. When you press 'Enter' the date will be displayed in 'dd Mmm yyyy' format allowing you to check that it was the correct month if you used a numeric value for the month. You can type in the date in most valid formats e.g. 01/01/1990, 1-1-1990, 1 Jan 1990, but you must use a full 4-digit year (if you do enter a two digit year MapMate will put '20' in front).
You can enter a date range by putting the word "to" between the start and end date e.g. "10 Jul 1999 to 20 Jul 1999". If you enter just the year MapMate will interpret that to mean a date range from 1 January to 31 December in that year; a month and year can be entered to represent a range between the first and last days of that month. You can enter a minus sign, or dash, (-') instead of the word 'to' (but not if you use the same symbol to separate the day, month and year). Records entered with a Date Range (or
'Vague Date') are not included in an analysis of occurrence dates
(Phenology).
If you omit the year the current year will be inserted. You can type "now" or "today" into the 'Date' field and when 'Enter' is pressed the current date will be entered; "yesterday" will give the previous day's date and "o/n" will enter a date range from yesterday to today. The computer System Date is used to resolve these terms, you can check that it is correct from the Windows 'Start' button and select 'Settings' > 'Control Panel' > 'Date/Time'.
'Status' This field is used mainly for botanical records where status could be "native", "alien", 'introduced' etc but status may be known for other organisms (e.g. "breeding", "migrant"). If the status in unknown type "unk" and press 'Enter' to insert "Unknown" as the status or type "not" and press 'Enter' to insert "Not recorded". (This field refers to the status of the individual specimen being recorded rather than the rarity, or conservation status, of the Taxon (for which there is a field in the Taxa table) e.g. a "rare", or "endangered", plant may be "native" at one location but "introduced" at another).
'Recorder' The person submitting the record. Enter part of their name and press 'Enter' or press 'F2' and select from the list. If the recorder is not already in the database click on the word
'Recorder' to the left of the field and from the menu that appears select 'Add a New Recorder...'. Enter the details of the recorder in the 'Data Entry: New Recorder' form.
'Name' The name of the Recorder (or Determiner; the same table is used for both). If you are sharing records or submitting them to a specific Records Centre it may be worth asking them if they have any convention about the order of surname, first-name or initials to reduce the number of different entries for the same recorder. Normally you would put the Surname first followed by the initials.
When you include yourself as a Recorder you should enter your name exactly as you did when you registered your copy of MapMate. If your name as a Recorder matches your registered name you will be able to edit records that other people enter with you as the Recorder and you can enter the word "me" in the
'Recorder' or 'Determiner' fields of the 'Data Entry: New Record' form for your name to be inserted.
'Location' The location where the recorder or determiner lives or works. Can be entered as 'unknown'. Perhaps it is only necessary to specify a location if there are two recorders with the same initials and surname. If necessary you can get to the 'Data Entry: New Site' form by left-clicking on the
'Location' label and choosing 'Add a New Location' from the menu.
'Comment' A field where you can add any extra details that would be useful. As with the 'Location' field, there could be Data Protection Act implications if personal details about an individual are entered.
'Determiner' The person who identified the species, often the same as the Recorder, enter the name as described for 'Recorder'. If you press 'Enter' without any text the name previously entered for Recorder will be inserted. The name of the Determiner can be entered as "undetermined" (e.g. if you are waiting for an expert to confirm the identification of a specimen) and the record will not then be plotted on Maps while it is undetermined. This field uses the same table of names as the 'Recorder' field.
'Method' How the record was obtained. Select from the existing list as for previous fields. It is possible to add a new Method if necessary by clicking on the
'Method' to the left of the field and selecting 'Add a new Method...' from the menu. Any Methods that you add will be replicated and used by other users.
'Reference' This field is used to give details of the source when records have been extracted from publications or collections. When you are entering your own records that have not been published you can give a reference such as 'unpublished records from Field Notebook'. If the Reference is not already in the database left-click on the word
'Reference' to the left of the field and from the menu that appears select 'Add a New Reference'. Enter the details of the Reference in the 'Data Entry: New Reference' form.
'Author' The name of the author or collector. Surname followed by a comma then the initials. If there is more than one author separate their names with semicolons.
'Year' The year of the publication or the year when you are entering your own unpublished records.
'Page Ref' The first and last page numbers of the article in the publication where applicable.
'Title' The title of the article if the record is from a publication. For your own records a title such as "Unpublished records of Lepidoptera from Somerset, 2003" but giving you own interests and location would be suitable.
'Comment' A field where you can add any extra details of the reference or explanation of entries in the
previous fields.
'Comment' (generally) A comment field where you can add any extra details of the record that would be useful and are not covered in the previous fields.
|